8 -
1
2
3
4
5
6
7
8
9
10
11
12
13
14
15
16
17
18
19
20
21
22
23
24
25
26
27
Spare parts catalogue
Caution
Bold reference numbers in this section identify parts shown in this exploded view diagram. These parts do not appear in the figures near the text.
Catalytic converter operating principle
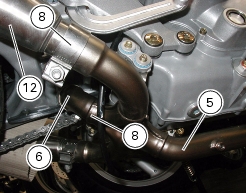
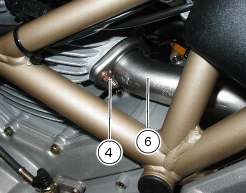
This model is fitted with "three-way" catalytic converters. They are fitted to the exhaust system in order to render exhaust fumes harmless, especially CO (carbon monoxide), HC (unburnt hydrocarbons) and NOx (nitric oxide). The catalytic converter has a special honeycomb support, coated with aluminium oxide, which makes surface rough, thus offering a wider area to exhaust gas exposure. Aluminium oxide includes some activated substances helping reducing harmful substances. Activated substances are usually platinum and rhodium. Platinum oxidizes (combines with oxygen) CO and HC. Rhodium reduces (combines with CO) NOx. Exhaust gases must contain a certain quantity of oxygen for CO and HC to be oxidized to create water and carbon dioxide and for NOx to be reduced into nitrogen and carbon dioxide. This requires accurate air/fuel ratio control. Air-fuel mixture ratio is controlled by our sophisticated fuel feeding system, which ensures top precision while dosing air-fuel mixture.
The lambda sensor (Sect. M 3) checks exhaust gas oxygen content and immediately outputs this information to the control unit. To ensure utmost efficiency of the catalytic converters installed at the exhaust, the control unit controls injection so that air/fuel ratio is maintained close to ideal value,within a certain tolerance, thus obtaining minimum emissions of hydrocarbons (HC), carbon monoxide (CO) and nitrogen oxide (NOX). 3-way catalytic converters then complete exhaust gas cleaning procedure converting CO, HC and NOX residues thus ensuring that emissions comply with EURO 2 standard.
Precautions for catalytic converter proper operation
In order to operate correctly, the catalytic converter must reach temperatures close to 800 °C and never less than 300 °C. However, exceeding the maximum temperature limit will irreparably damage the catalytic converter. For this reason, exhaust gas post-treating device should never include high amounts of unburnt fuel which would cause high temperature increase. This is why the ignition - injection system should always be in perfect operating conditions: ignitions should never be failed. In addition, never push start the motorcycle forward with the ignition key and the ENGINE STOP button set to ON. If the engine does not start, unburnt fuel will enter the exhaust system and get to the catalysts. Motorcycles fitted with catalytic converters can only be filled with unleaded gasoline. Lead would settle onto activated substances and limit their action against harmful substances in exhaust gas.
Removing the exhaust system
Loosen and remove the screws (11) securing the silencer brackets (13) and (19) to footpeg supports (A) on either sides of the vehicle.
Collect nuts (15) and washers (14).
If necessary, remove the spacers (10) and rubber blocks (9) from footpegs plates and remove the bushes (20) from the brackets (13) and (19).
Loosen the clamps (8) of the right (12) and left silencers (16).
Detach the two silencers from the horizontal head exhaust pipe (5).
Loosen the clamp (8) of horizontal head exhaust pipe (5) and vertical head exhaust pipe (6).
Undo and remove the nuts (4) that retain the exhaust pipe flanges to the heads.
Remove the flanges from the heads.
Unscrew the two retaining screws (24) of the exhaust pipes.
Collect the spacer (22).
Remove the horizontal exhaust pipe (5) from horizontal head and vertical head exhaust pipe (6); collect the seal (1).
Disconnect the lambda sensor (27) from main wiring harness (Sect. P1, Arrangement of wiring on frame). Please refer to Sect. M3, Lambda sensor, for any further detail on lambda sensor.
Detach the vertical head exhaust pipe (6) from the vertical head and collect the seal (1).
Caution
Block off the head exhaust ports to prevent the ingress of dirt into the combustion chamber.
Note
On the U.S.A. versions, there is a washer at the mounting point of right silencer to the pillion rider footpeg assembly for the canister support.
Refitting the exhaust system
Change the seals (1).
Refit the horizontal exhaust pipe (5) and the vertical exhaust pipe (6) to the heads.
Tighten the nuts (4) securing the flanges to the heads to the specified torque (Sect. C 3, Frame torque settings).
Tighten screws (24) with spacer (22) to the specified torque (Sect. C 3, Frame torque settings).
Connect the lambda sensor (27) to main wiring harness (Sect. P1, Arrangement of wiring on frame).
Insert the left (16) and right (12) silencers into the horizontal exhaust manifold (5).
Install the four vibration damping pads (9) – if they have been removed, on both sides of the footpeg plate (A).
Fit the bushes (20) into the silencer brackets (19) and (13).
Rest the silencer brackets against footpeg plates (A) and insert the bushes (10) fully home.
Insert the screws (11). Fit the washers (14) at the opposite end and snug the nuts (15) finger-tight.
Hold nuts and tighten the screws (11) to the specified torque (Sect. C 3, Frame torque settings).
Position the clamps (8) retaining the silencers to the exhaust pipe so that the screws are parallel to the axis of the exhaust pipe slots (B).
The clamps (8) should be flush with the exhaust pipes and the slots (B) should be partially covered.
Tighten the clamps (8) to the specified torque (Sect. C 3, Frame torque settings).