4 -
Lighting devices
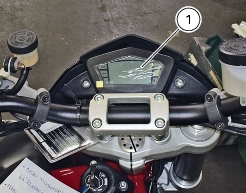
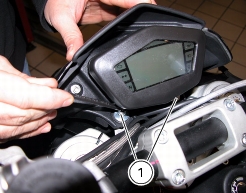
Removing the instrument panel
To remove the instrument panel (1), first remove the headlight fairing (Sect.
E 1,
Removing the headlight fairing
).
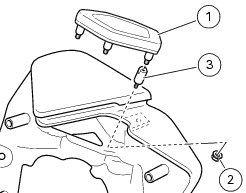
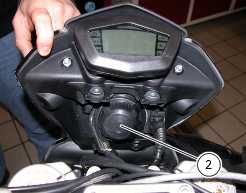
Undo the nuts (2) and collect the spacer (3).
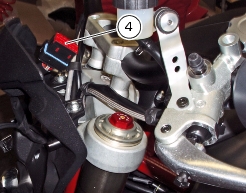
Disconnect connector (4) from wiring.
Installation is a reversal of the removal procedure. Be sure to tighten the nuts (2) to the specified torque (Sect. C 3,
Frame torque settings
).
Changing light bulbs
Changing the headlight bulbs
Before replacing a burnt-out bulb, make sure that the new bulb complies with the specified voltage and wattage (Sect. C 1.1,
Lights / instrument panel
).
Warning
Headlamp halogen bulbs become hot when turned on and stay hot for some time after they are switched off.
Allow bulbs to cool down before changing them.
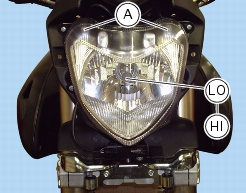
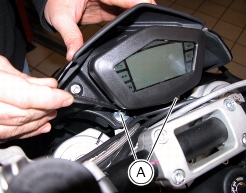
Bulb position in the headlight is as follows: low beam (LO), high beam (HI) and parking light
(A).
Low beam (LO) / high beam (HI)
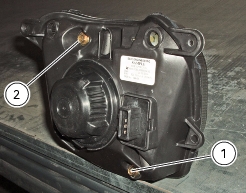
Loosen screws (1) with an Allen wrench to gain access to the headlight bulbs.
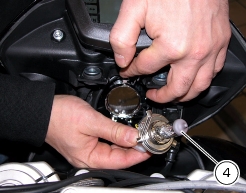
Ease off the headlight support towards the front until releasing the knob (2).
Unscrew the knob (2) turning counter clockwise.
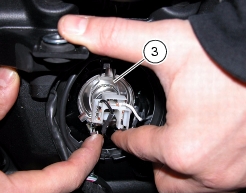
Release the clip (3).
The bulb (4) has a bayonet base: press and twist counter clockwise to remove. Fit a new bulb. Press and twist clockwise until it
becomes properly seated with an audible click.
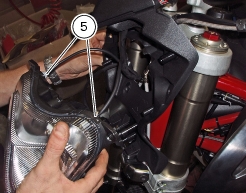
Parking light (A)
Remove the parking light bulbs (5) from their seat and replace them with new ones having the same rating.
Refitting the bulbs
After replacing any necessary parts, reconnect the cable connectors to bulb terminals, previously detached.
Reposition headlight knob (2) in its seat, fasten it to headlight body by screwing it clockwise.
Refit the headlight support to the vehicle and tighten screws (1) on the frame.
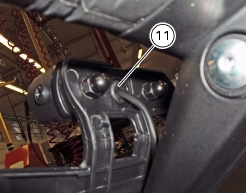
Replacing the number plate light bulbs
Remove the grommet (11) and extract the bulb.
High beam relay
It is fitted onto tank.
To gain access to this component, it is first necessary to remove the seat (Sect.
E 3,
Removing the seat
).
High beam relay (1) was added to the system in order to control the light automatic switch-off strategy, i.e.:
1 If on, the lights will automatically switch off when the vehicle is started.
2 If on, the lights will automatically switch off if the key is left ON for more than 60 seconds, with the engine off.
If this strategy is not working, check system operation.
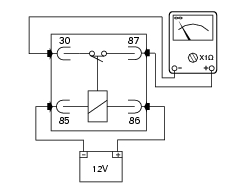
Checking high beam relay operation
Disconnect the relay from the electric system and power contacts (86) and (85) (small contacts) with
12
V (battery). The electric magnet must click.
Connect the multimeter to contacts (30) and (87) (large contacts) to check for electric continuity. Resistance value taken by the
multimeter should be close to zero and, if available, a continuity beep should be heard. If not, replace checked part.
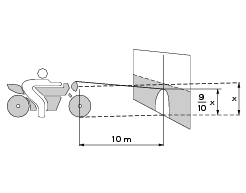
Beam setting
The motorcycle must be perfectly upright with the tires inflated to the correct pressure and with a rider seated.
Position the motorcycle 10 meters from a wall or flat surface.
On the wall or surface, draw a horizontal line at the same height from the ground as the centre of the headlight and a vertical line
aligned with the longitudinal axis of the motorcycle.
Note
This check should preferably be carried out in a well-shaded area.
Switch on the low beam. The height of the upper limit between the dark area and the lit area must not be more than nine tenths
of the height of the centre of the headlamp from the ground.
Note
This is the procedure specified by Italian standards to check the maximum height of the light beam.
Loosen the screws (A) using an Allen wrench and slide the headlight support toward bike front end until headlight adjusters can
be reached.
Turn the screw (1) to set beam height.
Turn the screw (2) to set beam on the horizontal plane.
Caution
Headlight manual adjuster screw (1) and screw (2) do not have any limit stop.
Refit previously removed parts.